Blue Hole 1 – A long par 4 begins this loop with a straight tee shot needed to avoid a spinney on the left and a ditch on the right. A large green, protected at the front and right by bunkers, awaits the second shot.
Pro's tip
1st Blue – A challenging par 4 begins this loop. 
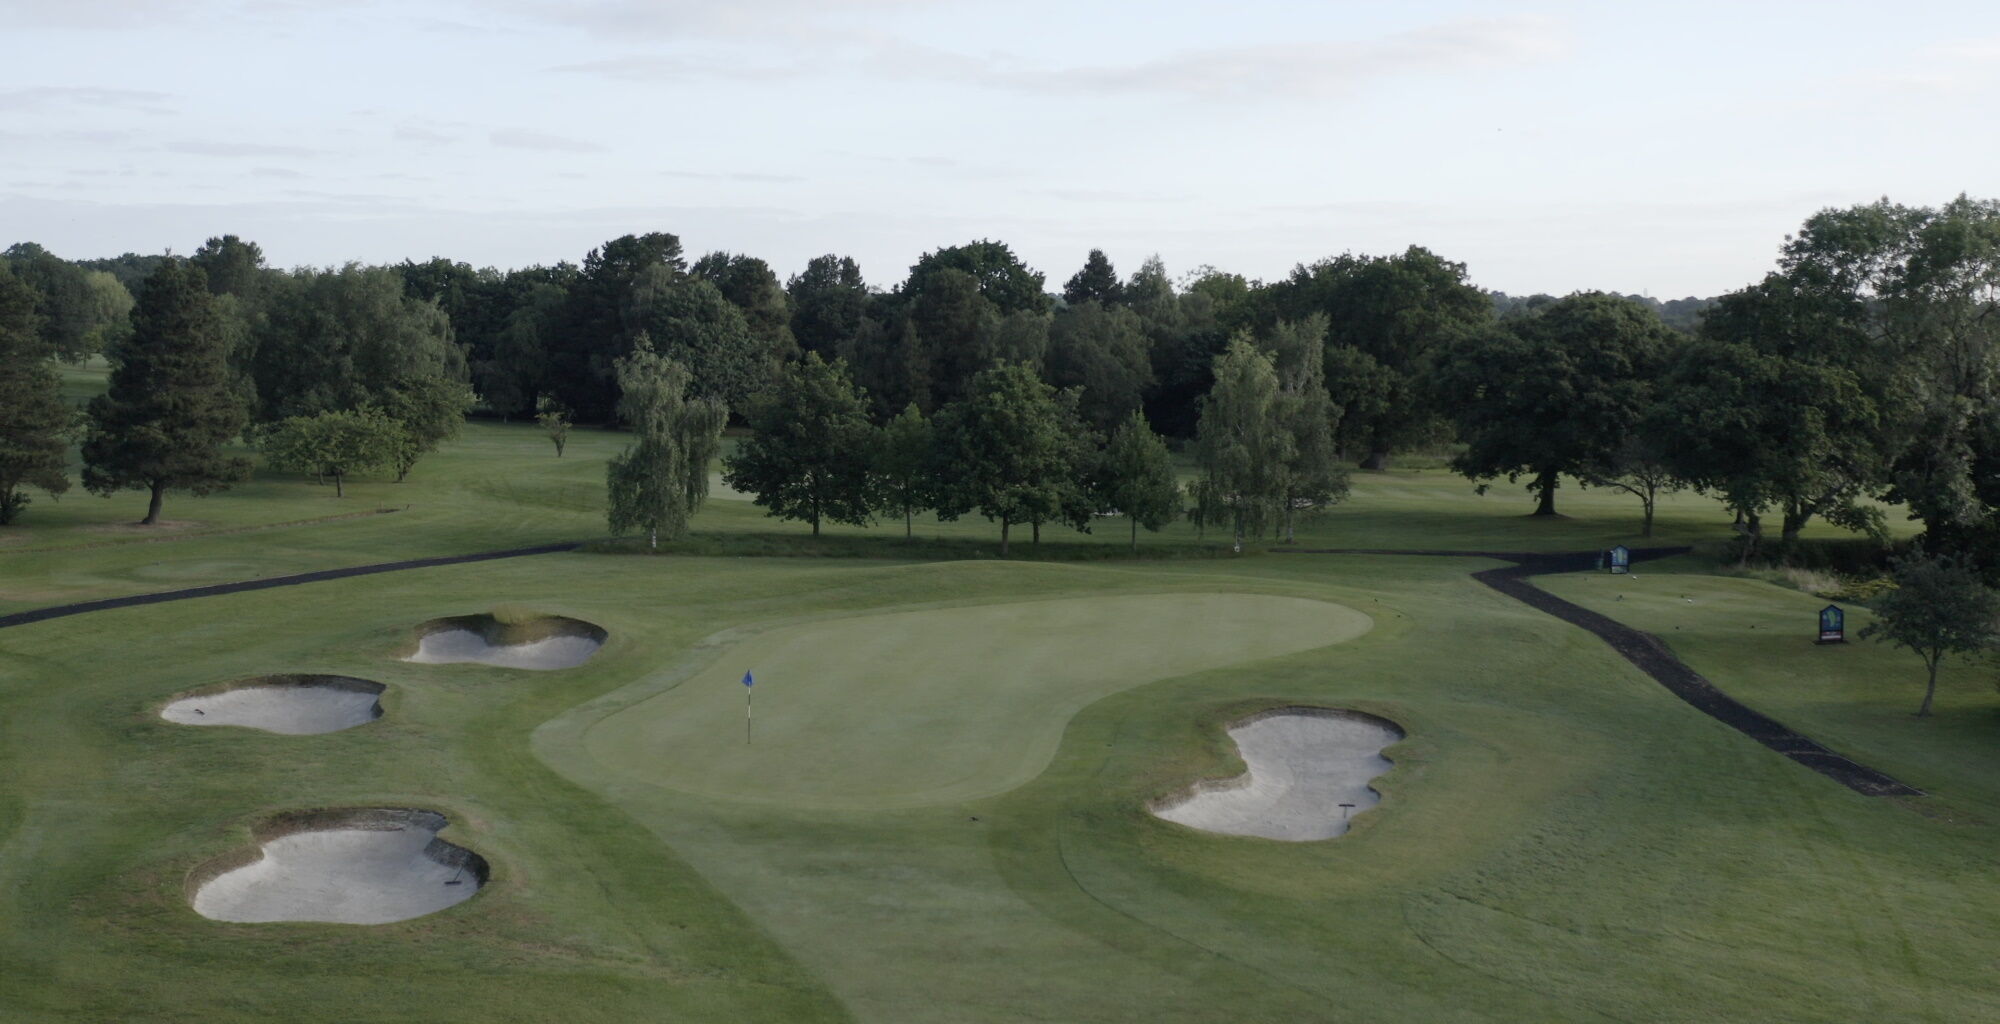
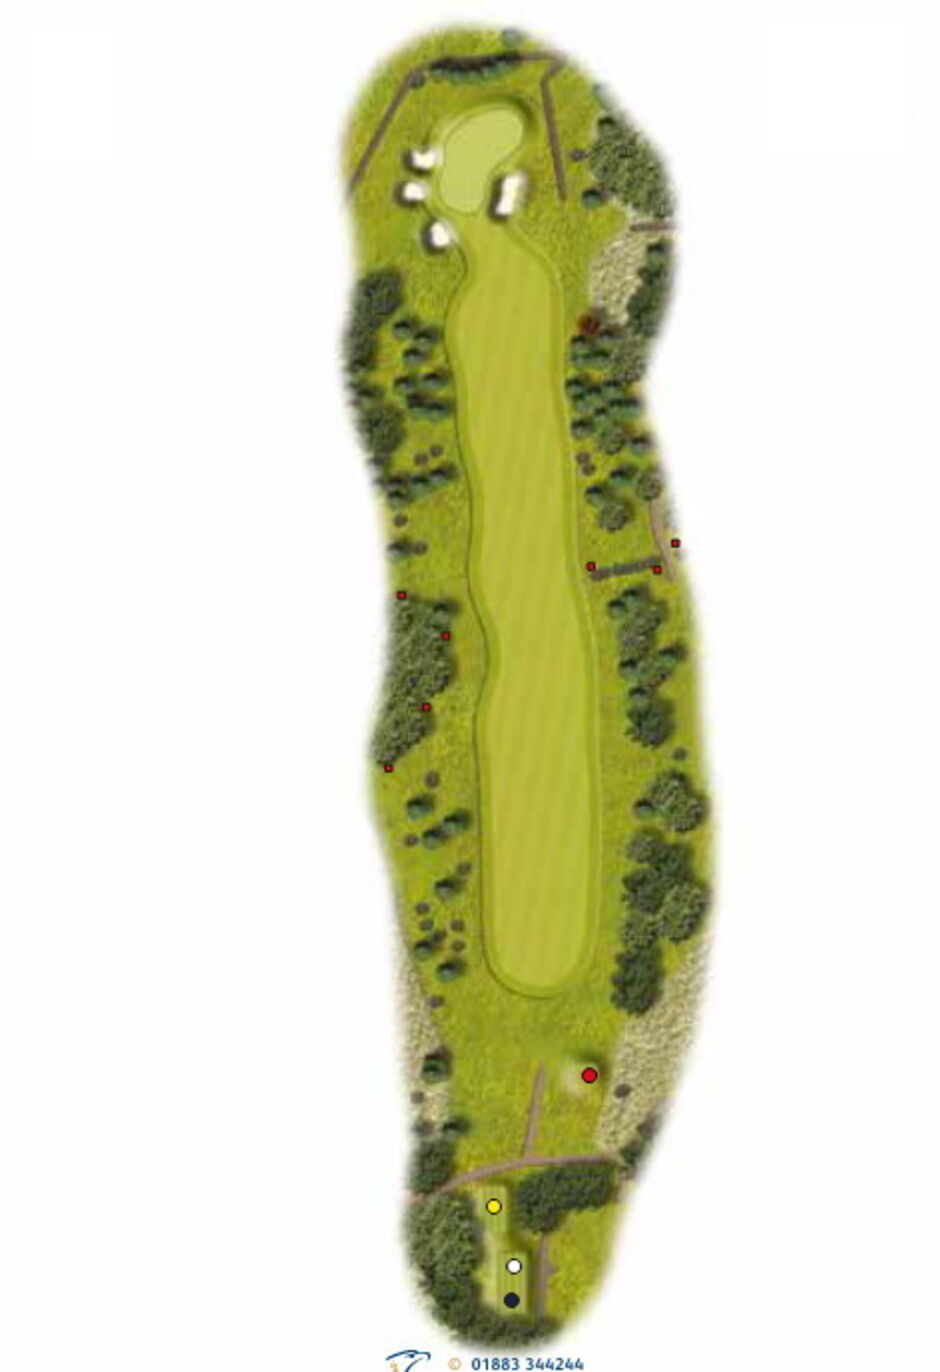
Pull your tee shot and you may find the ditch on the left-hand side or the copse beyond. Fade too much and the hedge at 170 yards from the green blocks you out. Beware your second shot to a very long green as the fairway slopes left to right and the ball will usually be below your feet. Three bunkers protect this first hole.
Blue Hole 2 – A similar length par 4 to the 1st, over a pond with two fairway bunkers awaiting the poorly hit tee shot at about 180 yards from the green.
Pro's tip
2nd Blue – A well struck tee shot needs to miss the fairway bunkers at 200 yards from the green and the ditches in the left and right-hand rough. Don’t be afraid to take an extra club for your second shot as the last 100 yards of the hole rises up quiet steeply from the cross stream. The green measures over 30 yards from front to back which also inclines slightly.
Blue Hole 3 – The longest par 3 on the whole course, at almost 230 yards. It is a tremendous challenge with a large Oak tree, bunkers and a cross-ditch waiting to spoil the outcome.
Pro's tip
3rd Blue – The longest par 3 on all the loops seems to play much longer than the distance indicates. If you miss the green you are better to be a shade long and right than anywhere else!
Blue Hole 4 – Although the shortest par 4 on the loop this hole demands respect. A straight drive up a left to right sloping narrow fairway rewards the individual with a short shot to a two-tier green.
Pro's tip
4th Blue – Allegedly the easiest hole on this loop. Players are always happy to come away with a par 4. Only 335 yards long the fairway slopes left to right so a well struck drive up the edge of the left-hand fairway will finish on the right-hand side beyond the second bunker, leaving the golfer with a relatively short shot to a two-tier green. Use the slope on the green to pitch the ball into when the pin is on the top tier.
Blue Hole 5 – A relatively straightforward par 5 with three pairs of bunkers strategically placed along the fairway and green.
Pro's tip
5th Blue – A straightforward par 5 - 500 yards long with two pairs of fairway bunkers positioned at 250 and 125 yards from the green. A well struck drive brings the green into play for your second shot. Beware the out of bounds from tee to green.
Blue Hole 6 – The field hole challenges the brave with a well struck drive over the out of bounds on a right-angled left to right dogleg. Be careful not to reach the stream by taking too much off the corner of the field.
Pro's tip
6th Blue – The hole known as ‘the field hole’ is the toughest on this loop. A well struck fade across the left to right dogleg gives you a fair chance of reaching the green. Try to take too much of the corner off and you will be reaching for another ball.
Blue Hole 7 – A generous sized green to this par 3, positioned in front of a ditch over a pond and protected in front by a solitary bunker and a lateral ditch on the right-hand side.
Pro's tip
7th Blue – A good looking par 3 over water with one small bunker and a ditch running out of the pond down the side of the hole. Club selection is key. Don’t be too long as a ditch behind the green will pick up your ball.
Blue Hole 8 – This par 4 is protected on both sides by trees and two bunkers positioned up the left-hand rough over 30 yards, ready to gather the drawn tee shots. A large green awaits the successful second shot protected on the left by a long bunker.
Pro's tip
8th Blue – This par 4, although approximately 370 yards long, plays closer to 400 yards as it deceptively slopes uphill. A straight drive is imperative missing the trees either side of the fairway and the two fairway bunkers. You are better long than short to this back to front sloping green, which measures 36 yards long.
Blue Hole 9 – If you wish to get close to the green in two this right to left par 5 dog-leg requires a high tee shot with draw. From tee to green the hole rises several feet to the road crossing the fairway, before gradually flattening out to the green protected by a bunker on the right.
Pro's tip
9th Blue – This hole is a challenge for the low handicapper – a right to left dogleg with a very high carry over trees rewards the brave with an uphill 200 yard approach shot to the green. The Club players will play the hole conventionally with a tee shot to the corner of the dogleg, a 3-wood and short iron to a generous green guarded on one side by a bunker. Don’t be tempted to attack the flag when it is positioned at the back of the green otherwise a delicate chip back is needed to save face.
Red Hole 1 – A long downhill par 4 opens this loop with a lateral ditch running half the length of the left-hand side of the fairway. Avoid the dense trees populating the right-hand side beyond the fairway bunker and large Oak tree midway down the hole.
Pro's tip
1st Red – A straight drive at this opening hole sets the golfer up for a regulation start. Be off line either way and you are staring at a bogey start. A ditch over 200 yards long guards the left-hand side of the hole whilst a projection of trees down the right will make your approach shot to the green nigh impossible.
Red Hole 2 – A generous width to the fairway on this left to right sloping dogleg. Beware the young trees and lateral ditch up the right-hand rough.
Pro's tip
2nd Red – This hole favours the faded drive provided you direct it along the left-hand third of the fairway. Fade too early or pull your tee shot you are looking at a bogey result.
Red Hole 3 – A short par 4 dogleg severely left to right. A fading tee shot over the corner of the dogleg avoiding the bunker is rewarded with a chip shot to a well guarded green.
Pro's tip
3rd Red – Most golfers are pleased to make par on this supposed easy hole. The brave high fade across the left to right dogleg rewards you with a short chip to a well guarded green. Play the hole conventionally to the corner of the dogleg and your second shot may be 140 yards or so.
Red Hole 4 – The second longest hole at Kings Norton requires an accurate tee shot to enable the second shot any chance of being close to the green. The uphill rise to a narrow opening to the green is protected by greenside bunkers 200 yards away.
Pro's tip
4th Red – One of the longest holes on the course at over 540 yards. This demands an accurate tee shot over water avoiding the Weeping Willow and the bunker on the right-hand side of the fairway. Once in good position off the tee you can set up to make the third shot a short shot uphill into the green. Don’t be tempted to take a 3 or a 5 wood if you end up with a downhill lie for your second shot.
Red Hole 5 – The shortest par 3 of the course is well guarded with bunkers front, left and right. Be careful with club selection as anything too long might never be seen again.
Pro's tip
5th Red – The shortest hole on the course is guarded well with bunkers. Don’t over club here as the second shot may be tricky coming back providing you find the ball.
Red Hole 6 – A challenging driving hole. Straightness is of the essence. Once through the narrow gap at the top of the hill the decline assists in making the approach shot to a back to front sloping green a relatively easy task.
Pro's tip
6th Red – A tight driving hole requires a high degree of accuracy to set up a birdie opportunity as the hole declines steeply for the latter 200 yards. An inaccurate tee shot left or right is trouble and may result in a walk back to the tee.
Red Hole 7 – The Club’s feature hole “The Water Hole”. Decision time – do you play left or right of the hazards? The strength and direction of the wind, together with the pin placement are the governing factors, on what side of the stream and ponds to play.
Pro's tip
7th Red – This hole is fraught with danger as it features three ponds, one fairway bunker, an out of bounds down the left and a stream interconnecting the ponds running the whole length of the hole. Your decision on what side of the stream to take is governed by the wind direction and the pin placement.
Red Hole 8 – This par 3 has wrecked many a Medal card and decided a few Matchplay situations. A long green with out of bounds down the left and water to the right. Club selection is paramount at this hole.
Pro's tip
8th Red – A few deep breaths and two or three swings of your club are needed before taking on this little master. The green runs parallel with the out of bounds on the left and with a long pond to the right. This hole does require an accurate and well struck tee shot.
Red Hole 9 – A very long uphill par 5 with fairway bunkers strategically positioned to catch inaccurate drives and second shots. A 40 yard length green demands a correct club selection to avoid three putting.
Pro's tip
9th Red – A long par 5 to finish, mostly uphill to the longest green on the course. Most golfers are satisfied to make the green in 3. Check the pin position before leaving the teeing ground. Hitting this green doesn’t guarantee a 2-putt!